The service cars are:
- An old Pittman single truck work car. CURX 00
- An All-Nation C.E.R.A box car. CURX 03
- An incomplete wooden sheath box car. CURX 05
- A secondhand interurban flat car. CURX 07
- An interurban flat car kit by Midwestern Hobby Models. CURX 09
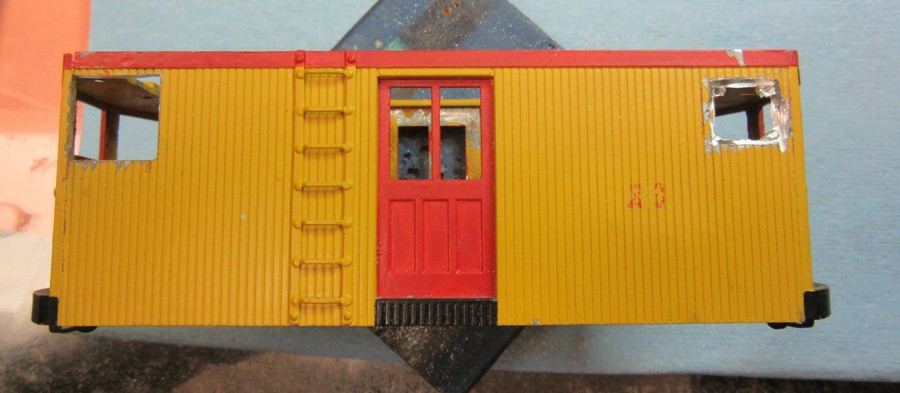
Originally completed about 40 years ago, this work car had been painted yellow with red trim. The roof, underbody, and truck sideframe were painted a weathered black.
If you're familiar with the model, you know the motorman can only see forward and not to the sides. I've always wanted to add side windows just like the ones I had added to my Pittman box motor. .After looking into the use of the same windows, I found them to be too small for what I wanted. Instead a larger size Grandt Line window was chosen.
Adding the windows is easier than you think. Know where the sides have to be cut and work slowly. It's better to make the initial window cut-outs for a smaller window and work your way to a larger size. The photos will show the steps I took. The work took a little less than 30 minutes per window. Most of the time was spent filing the metal to the correct size.
I like the Grandt Line windows because they have a casing around the window as part of the plastic casting. The casing hides the edges of the hole filed into the metal side of the model. Although many windows in railroad cars did not have a casing around them, the windows added to the model with a casing do not stand out as being unusual.
The paint was not removed from the model. If this was a better, more important model the paint would have been removed. However, the model was lightly sanded to remove any loose paint, remove the decals, and smoothened the metal.
The 1st photo was taken with the model in its side. For the Blog the photo was rotated to the right. Also, notice the new window openings have been cut into the side. I had forgotten to take this photo before starting the work on the model.

This photo gives you an idea as to how the selected window looks compared to the end windows. The new windows will be shorter and wider.

The side of the model prior to starting any cutting

Smaller than required holes have been cut. Lines had been drawn to show where to cut.

A window has been placed next to the hole to show how small the hole is. The window needs to be turned to the correct orientation. Mill files were used to cut the hole to the correct size.

The window in the enlarged hole.
One hole on this side done. The other has to be enlarged.

Both holes are completed.

The windows have been glued into place. Notice the mullions have been cut out and the window frame sanded. My windows will be 1 pane of glass. This will give the motorman an unobstructed view.

When all the windows were installed, the model was spray painted with the same color as the portable substation. Above the model are cut-outs of potential words to be made into decals. They are being tried out for size and location.
More about finishing the model and making personalized decals in the next Post.
Cheers,
Ed
No comments:
Post a Comment