Rich Wagner purchased a metal turning lathe and made the wheels, pulleys, worms, and gears used in making the power trucks. The lathe itself had non-standard gearing. This meant the worms and gears were not standard and unique to Wagner's drives.
In purchasing Wagner's power truck and trolley parts business Ed Miller also purchased the lathe and other machines used to make the power trucks and parts.
When talking about both Wagner or Current Line Models power trucks the term "Wagner design" will be used in this and future post on the topic of "Model Power Trucks".
Prior to 1st Time Usage - Purchased New
When either a Wagner design or Q-Car power truck is purchased new and installed for the first time, before actually installing the power truck place a drop of oil on the axle next to each side of the gear box. Also place a drop of oil in each of the 4 side-frame bearings.
Then the power truck should be allowed to run "on the bench" for about an hour - 30 minutes one way and 30 minutes the other. During this time frequently check to see if the motor and gear box are overheating. The motor should get warm but not too warm to hold. Don't forget to check other parts of the power truck for overheating - the journal boxes.
The truck must be "square on the track" with all 4 wheels touching the rail equally. A minor twist of the truck may be needed to bring the truck into square.
Hook up the power truck to a power supply with an ammeter and voltmeter. If you do not have a power supply with these meters, you should purchase one. During the hour "on the bench" running the amperage drawn by the motor should decrease as the parts of the power truck are "broken in". The voltage should remain fairly constant.
Watch the ammeter, if it starts to go up and/or indicates a short, there is something wrong. More will be said about this in future posts.
Lapping Gears
One step which can make a Wagner design power truck operate more smoothly is lapping the gears. This is a polishing process which removes any spurs on the teeth of the worm and gear. Any modeler can do this.
The gear box is packed with DuPont or similar automobile rubbing compound. Before starting the power truck, be sure there is grease or thick oil in the gear box. The power truck is run for about 30 minutes in one direction and 30 minutes in the reverse direction.
After the hour's time, the gear box must be completely cleaned out. Lacquer thinner can be used. Then the gearbox must be re-greased. Rich Wagner used Lubriplate. A fine lub-grease in its time. Unfortunately it would dry out over time. Today Labelle's 106 plastic compatible lubricating grease should be used. It contains newer lubricants far finer in size and slipperiness. About a 1/4" of the Labelle's grease is all that is needed.
Lapping the gears does not have to be done with Q-Car power trucks. When 1st installing a Q-Car power truck only placing a drop of oil on both sides of the gear box is required. Q-Car uses commercially made worms and gears.
Prior to 1st Time Usage - Purchased Second Hand
Whether the power and trail trucks come in the original box they were originally sold in, come in a second hand box or loose, or installed in a model; treat the power and trail trucks as though they have been in storage for longer than a year. See the part of this post which deals with Models Which . . . for Longer Than a Year.
Models Which Have Been on Display and/or Stored for Less Than a Year
When a model has not been used for this period of time, both Wagner design and Q-Car, lubricate the gear box by placing a drop of oil and both sides of the gear box. The oil will "wick" into the gear box and onto the gears. Wait about 15-30 minutes before operating the power truck.
At the same time the drop of oil is placed on both sides of the gear box, the 4 axle ends which go into the side frames should receive a drop (or less) of oil. DO NOT OVER OIL THESE AREAS. The excess oil will find it way onto the threads of the wheels. This will cause a build-up of gunk on the wheels interfering with the electrical pick-up from the rails.
If the power truck uses an open frame motor do not forget to place a drop of oil on the felt wicks in the motor.
Both the Wagner design and Q-Car power trucks are designed for long service as long as they are taken care of by the modeler. Should you start to hear squeaking coming from a model in operation, it's time to lubricate the trucks usually where the axles extend into the sideframes.
Always use a quality oil and grease on your power and trail trucks. LaBelle Industries provides quality light and medium weight plastic compatible oils and grease.
Models Which Have Been on Display and/or Stored for Longer Than a Year
The longer a power truck has been stored the greater the chance the grease has "dried" up. This means the grease in the power truck gear box must be cleaned out. Use lacquer thinner to dissolve the grease. Re-grease the gear box with Labelle's grease.
Also all of the lubrication mentioned in Models Which . . . for Less Than a Year must be carried out.
Spring Belts and Pulleys
Whenever a power truck is lubricated with either grease or oil, DO NOT GET GREASE OR OIL ON THE SPRING BELT USED TO POWER THE NON-GEAR AXLE! If you do, remove the grease or oil by using lacquer thinner and something like Q-Tips.
Over time spring belts can be pulled out of shape - they become too long. Replacement belts are available from both Current Line Models and Q-Car Co.
But before doing this, if the spring belt is slipping, inspect the pulleys. During operation the spring belt polishes the pulleys. The smoothness of the pulleys can be removed by running by hand a good, small, round cross file over the pulleys. Scratch-up the brass pulleys as best you can. This will restore the "grip" between the spring belt and pulleys.
Older vs. Newer Standards
In the 1950's Wagner offered NRMA standard wheels. That is, the wheels were 0.172" thick with standard thread sizes. Over time he started to offer variations from standard. Very old Wagner power trucks have what look like oversize flanges when compared to today's wheel offerings.
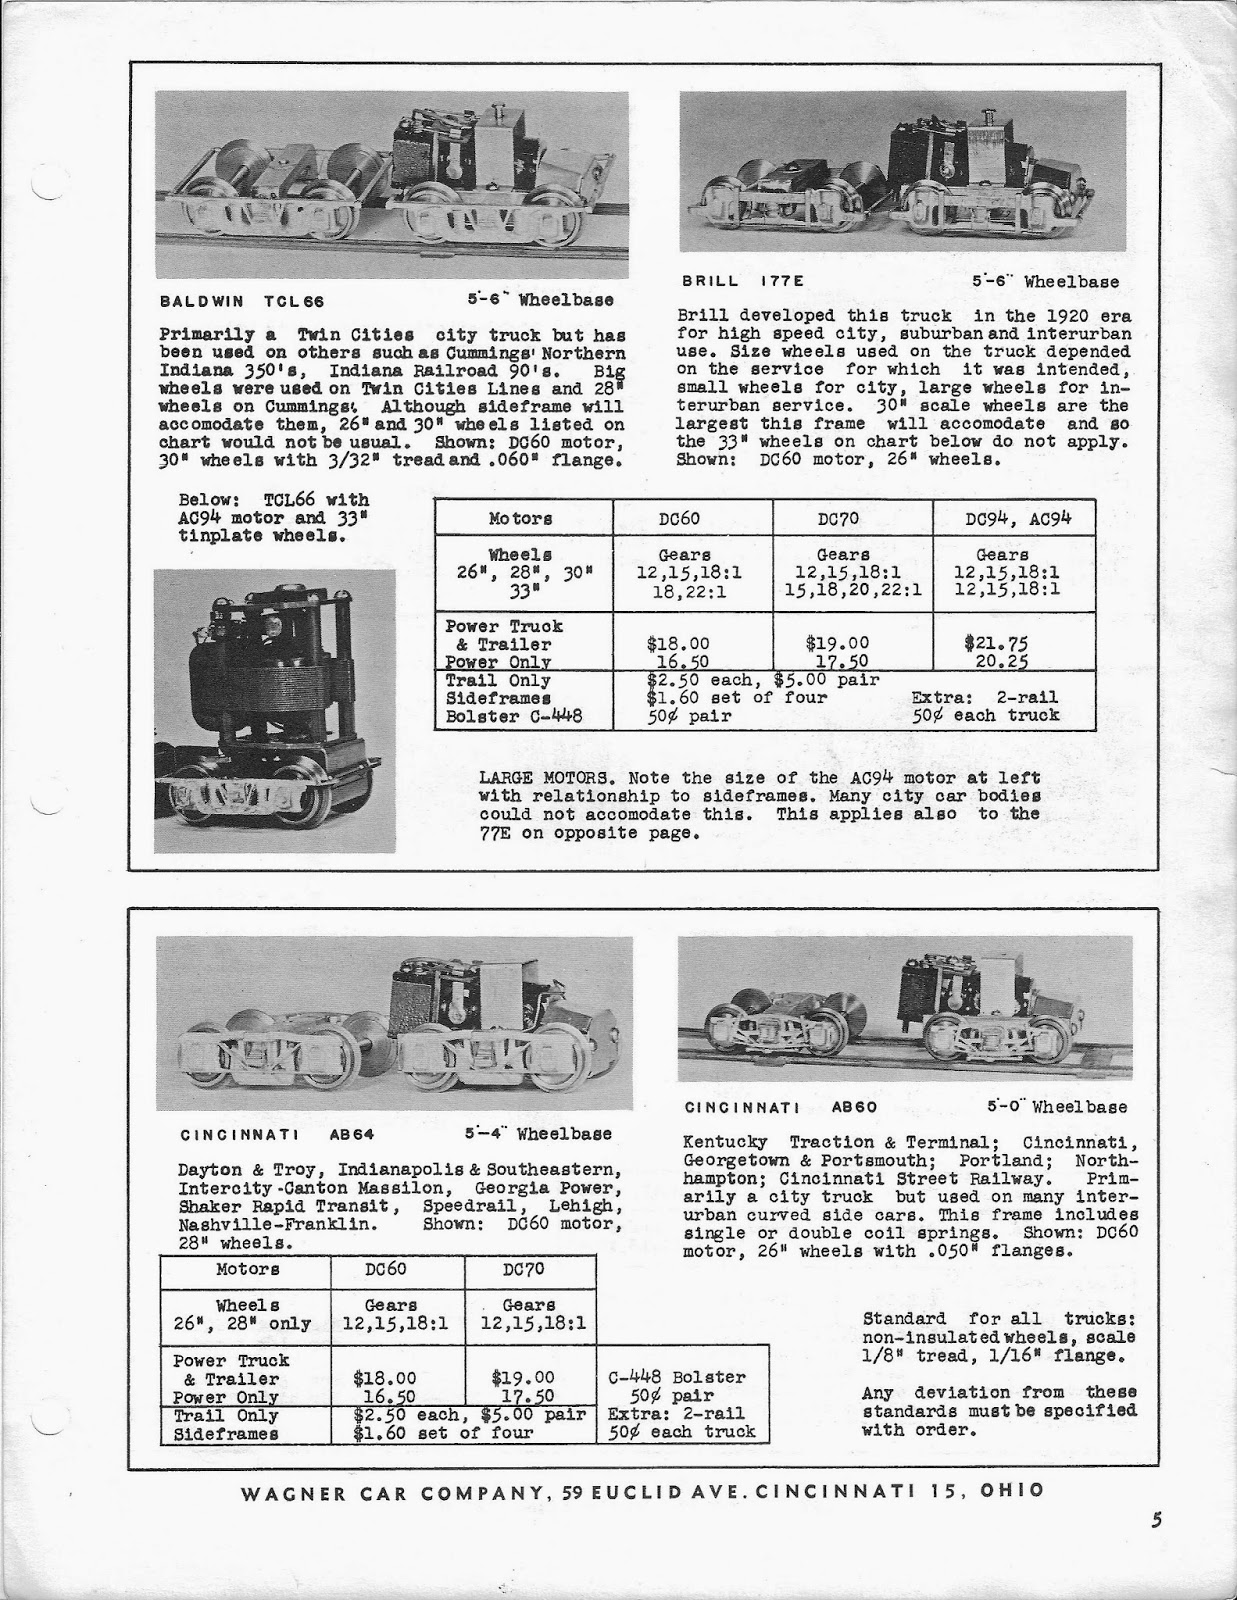
An important piece of information in the Wagner catalogue in the prior post is the "Gear Outside Diameters" diagram on the inside cover. If you have a Wagner design power truck and do not know the gear ratio, measure the size of the gear.
As mentioned in the 1950-60's, the standard O scale wheel was 0.172" thick. This was for both steam/diesel and trolley models. Over time the standard has dropped to 0.145" thick wheels for steam and diesels and 0.135" for trolleys. Interurban lines use either the 0.145" or 0.135". Fine standard Proto-48 uses a 0.115" thick wheel.
When Proto-48 standards are applied to a track work, not only is the gauge corrected but the clearances used in other track work like turnouts are corrected or reduced. This means wheel sets with 0.115" wheels can get caught in regular O scale turnouts at the frogs.
Just as the thickness of wheels decreased in O scale, the flanges have been reduced in size over time. If you and/or your friends are running both older and newer models, accommodations sometimes have to be made. Modelers, who for the most part, are the only ones using their layout may find when other modelers visit with their models some problems occur at turnouts and crossings.
Today many modelers have either switched to or are using NWSL wheel sets. Over a year or more ago the original owner of NWSL retired with the company being purchased by a new owner. Initially things were rough.
The new owner had many, many stocks of inventory to go through and find storage for. Then some items became short in inventory causing order delays. While I have not ordered NWSL items direct for a over a year, I hope many of the problems have been ironed out.
One Modeler's Take on Power Trucks
One modeler who had magical powers over power and trail trucks was Ron Hastie. Ron was a master mechanic and fine tool machinist by trade. If Ron was not a tool and die maker, he was very chose to being one.
Ron's models always ran without gear noise coming from the power truck. It was a thrill to see one of his models run in a quiet room. Only the sounds of the wheels going over the track could be heard. It was the same as watching a prototype trolley passing by.
Over the years I and others had many conversations with Ron about what he did with power trucks. However, Ron never disclosed exactly what he did to quiet the motor and gear noise of a power truck. Ron took this information with him to the grave!
But, I can tell you something about Ron's models. Ron's models were heavy. He would completely rebuild the underbody of a model as best he could to the original specifications of the manufacturer of the prototype with structural brass. The seats and passengers were made from soft metal. All of this added up to weight! The more the weight the better the model should run.
The weight of a models, in and of itself, can help to reduce the sound a model makes as it runs over the track. Of course, at the same time this places stress on the gear train and the motor in the power truck. It also causes excess wear on the rail. This may be the reason Ron was interested in rebuilding power trucks which had failed. Ron and I spent many hours on the telephone talking about rebuilding power trucks.
Next, the gear box in a power truck in one of Ron's models, which I purchased from Ron's estate, was packed with a black colored grease. Packing a gear train with thick grease will quiet the gear train. Ron's knowledge of grease may have played into what he used in the gear boxes of his models.
In years past I sold more than one automobile with excess engine or transmission gear noise. The engine's crank or the transmission case was drained and filled with STP. STP was an extremely thick, honey colored engine additive. Hint: This should be done during warm weather or if the car is stored in a heated garage.
The thicker the grease used the quitter a gear box will sound. However, the thicker the grease, the greater the amount of energy required to start and continue turning the gears.
Model Weight
From time to time, a Wagner power truck will wear out. This happens when the car in which the power truck is mounted weights too much. If a power truck does wear out it has to be returned to the manufacturer for repair.
The inside back cover of the Wagner Car Co. catalogue included in the prior post has a number of excellent suggestions regarding power trucks and models. Little info is included about how much a model should weigh.
The standard rule of thumb for how much an O scale model should weigh is 5 oz. + 1 oz. for every inch of model length. For example an O scale model of a steel NSL or CA&E car is approximately 14 inches long; therefore 5 oz. + 14 oz. = 19 oz. or 1 lb. 3 oz.
Never add weight to a model to cause the total weight to exceed the recommended weight for the models size. A model can weigh less but never more.
I recommend the weight to be more (perhaps up to 60%) on the power truck with less (the balance of the weight) on the trail truck. This will give good tractive effort and at the same time the powered model will track well through turnouts and curves plus be able to pull a trailer.
Once again, do not overload your model in weight or the amount of weight your model has to pull. If the model is a locomotive take into account the number of cars the prototype locomotive pulled. If required double power your model.
If your passenger model should be puling a trailer and cannot, consider installing plastic seats and passengers in the trailer. Plastic flip-over seats can be obtained from Keil-Lines Products. They advertise in O scale model publications.
Final Comments
We have all heard the comment, "When in doubt read the insert!" This is great advice. When unpacking my Sunset NSL Electroliner, a brochure on the model fell to the floor. By chance I read it. One of the instructions was to place grease in all of the model's gear boxes before operating the model. The gear boxes were shipped dry.
A word to the wise is to always read the instructions which come with a model!
NWSL has already been mentioned. Many years ago they introduced the Magic Carpet. This was an under-the-floor power unit for O scale. Prior to the NWSL Magic Carpet, the Multi-Unit was available.


Multi-Units were great as under the floor power units. Unfortunately they could draw high amperage. To me, their main drawback was ballast and dirt getting into the gear train plus the use of a non-permanent magnet motor. Wiring the model could be a problem.
The Magic Carpet also had a problem with ballast and dirt getting into the gear train. The bigger problem was the plastic used to make the gears. The gears were force fitted over the axels and metal shafts in the gear train. The tight fit on the shafts combined with the proprieties of the plastic caused the gears to split in 2. There was no way to repair the split gear other than to obtain a new Magic Carpet.
NWSL has redesigned the Magic Carpet - now called Magic Carpet II. I have not had the opportunity to see and use the new drive units. I do have a model with the older units. Some time in the future they may need to be replaced with the newer Magic Carpets II.
More comments and tidbits of information in the next post.
Cheers,
Ed