To paraphrase Vane Jones, "Knowledge is of little value until shared with others."

Sunday, April 29, 2012

AEFRE 49 - #2A Which Came 1st, the Chicken or the Egg?

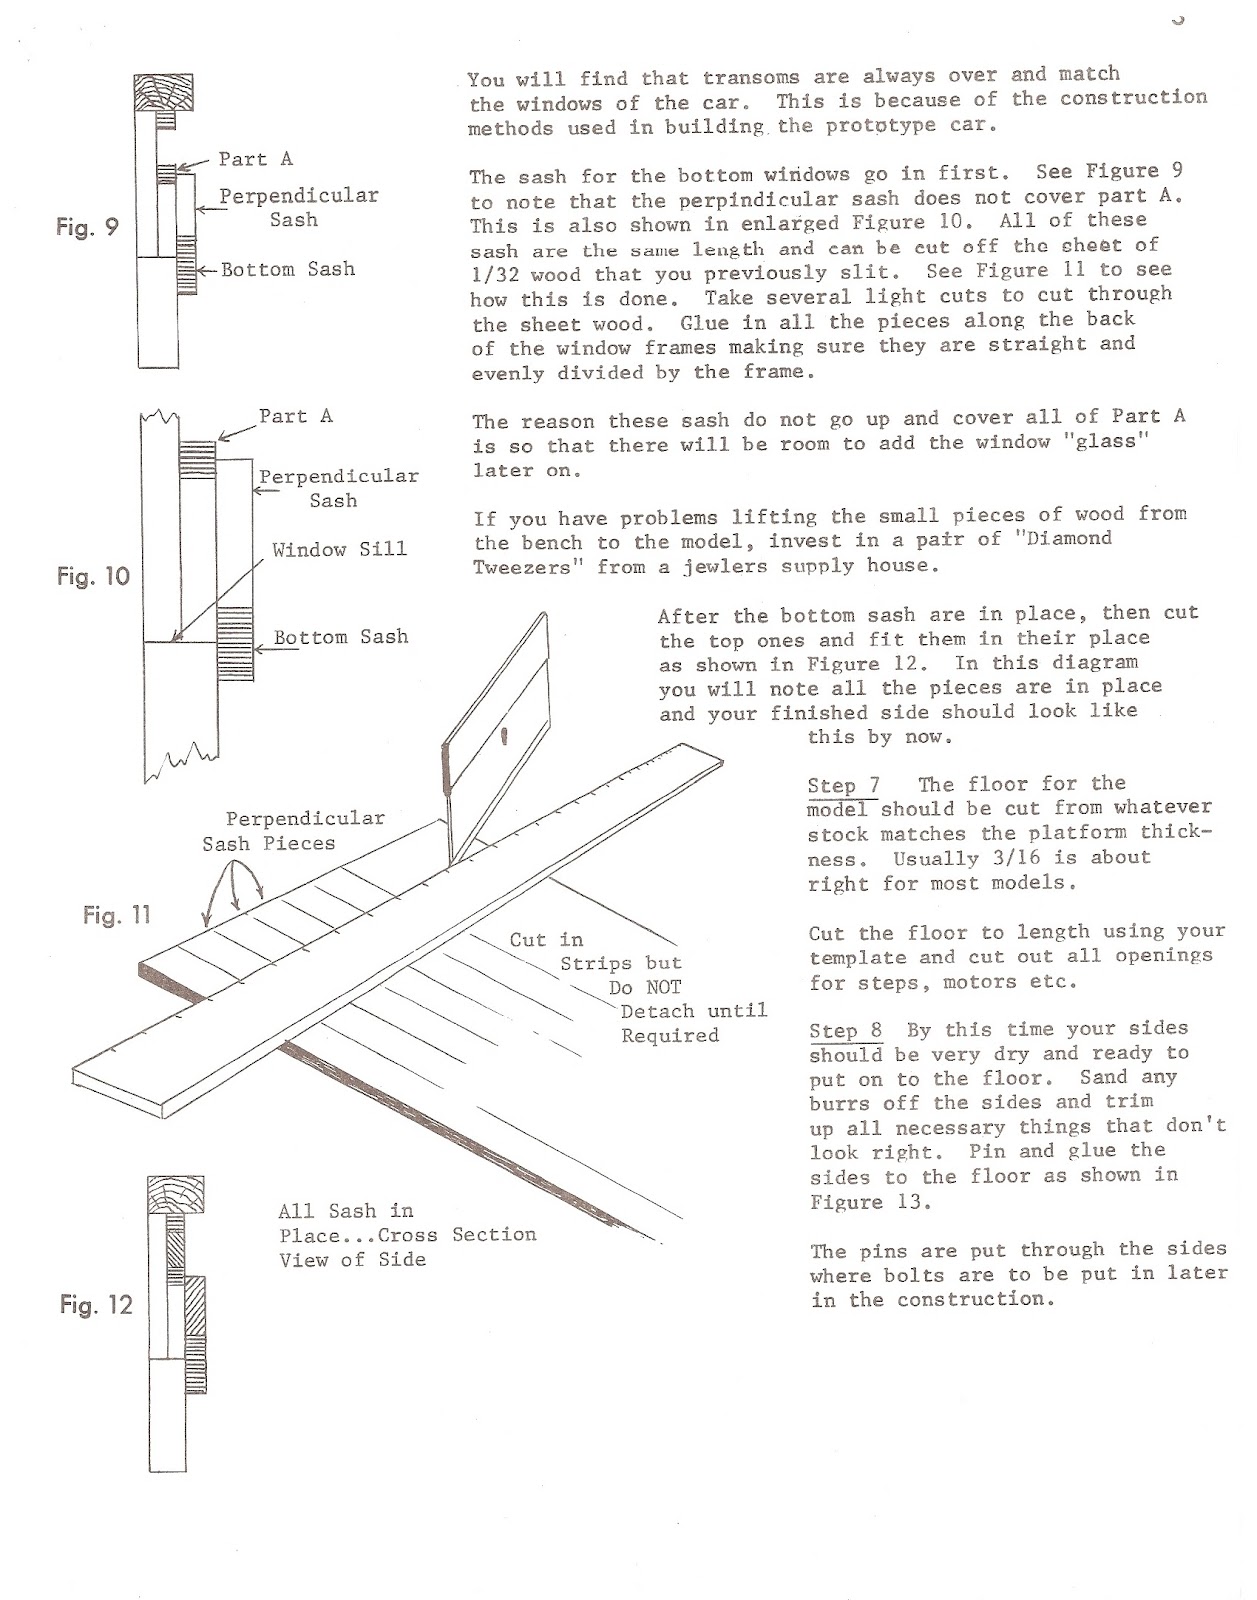
Modeling Notes: All soldering was done with a 60 watt hot iron and not a soldering gun.

A hot 60 watt soldering iron beats a cool; soon to be warm, soldering gun any day just like 4 aces beats a full house.
When the soldering part of making a model comes up, always keep a small bowl of cool water handy. You can never tell if you will need it for the model or your fingers!
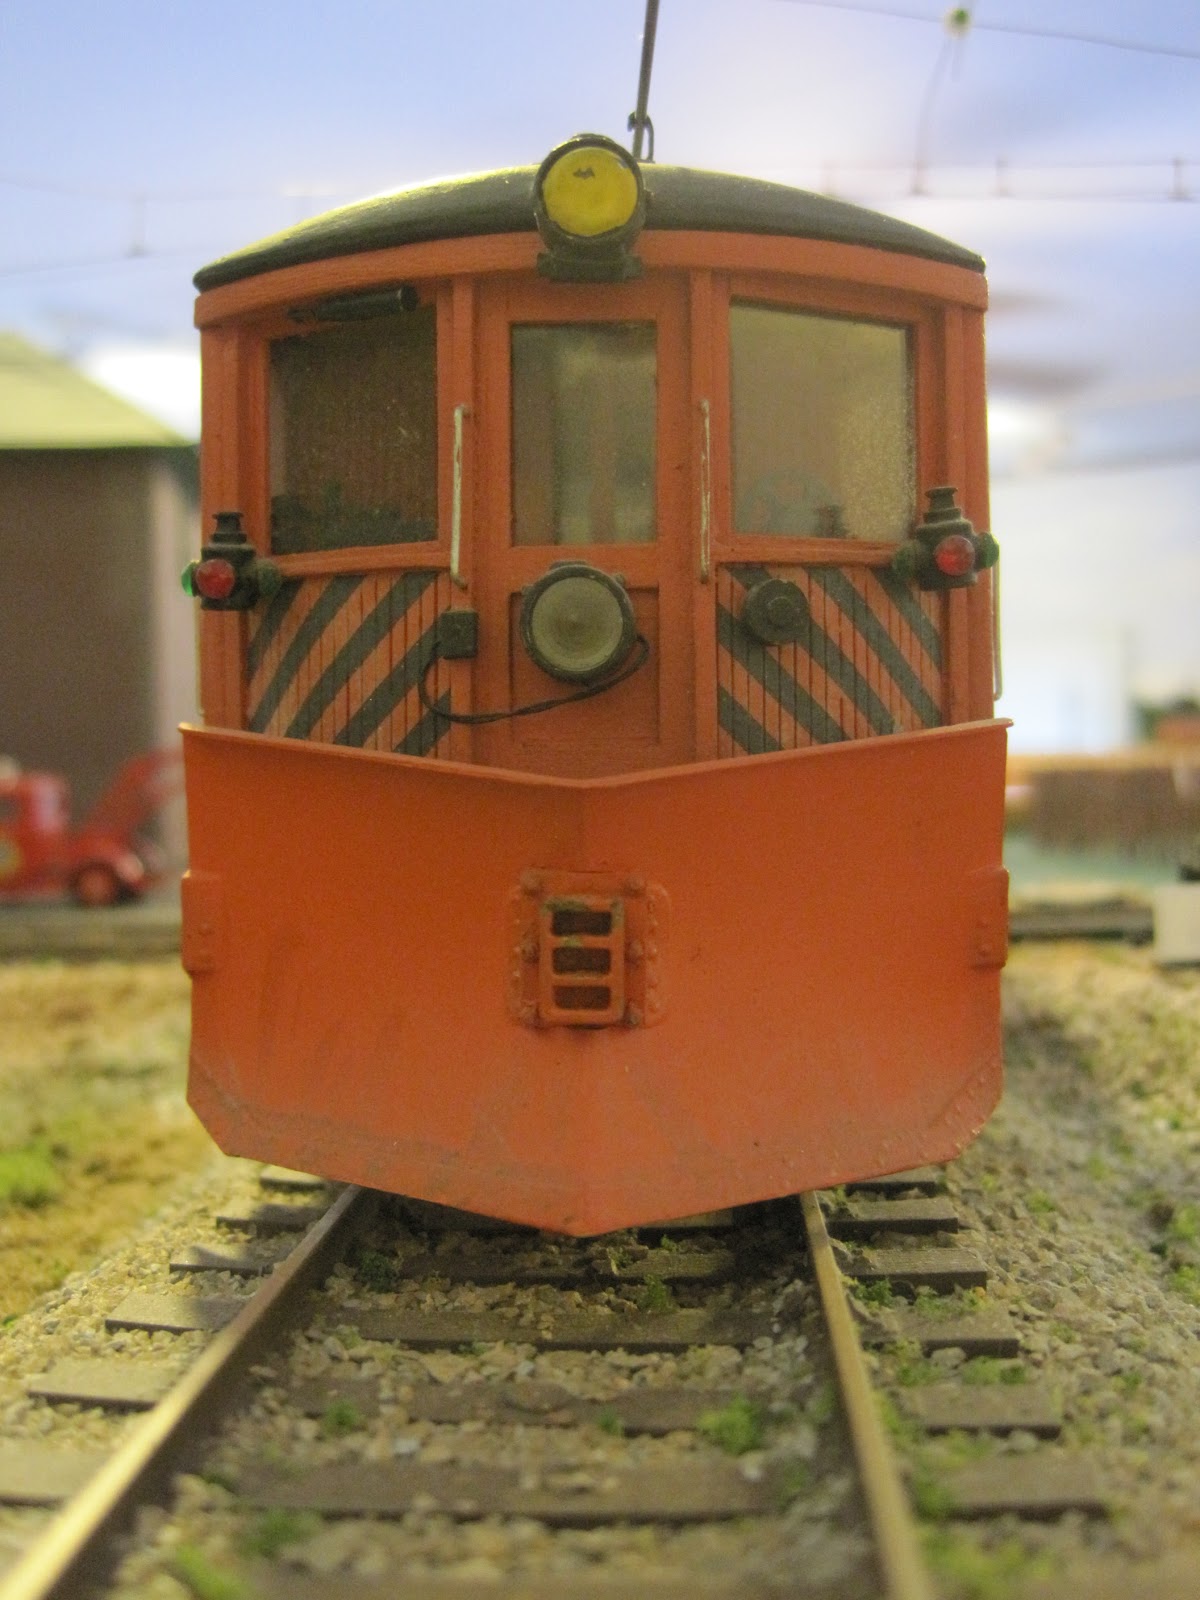
CAUTION: Needless to say wear safety glasses at all times when constructing a model. If you do not have a pair obtain a set. Become accustom to wearing  safety glasses.

I wear eye glasses for various corrections needed for my vision. The frames are oversize and the "corrective lenses" are made from the same material CD's and DVD's are made from - polycarbonate.  They are average safety glasses.

There are a number of construction steps where something is being done which can be hazardous to your eyes. You may not always be aware of the hazard.

Which did come 1st, the chicken or the egg?
The answer is simple, the power and trail trucks were obtain before the model was started. #49 had trucks with Peckham 30 side frames which have a 6’ wheel base.

The only available Peckham side frame is made by Current Line Models. It is a Peckham 40 having a 6’8” wheelbase.
Current Line Models Photo

The additional 8” will cause problems on the model with the coupler draft gear, the foot boards on the end of the model, and the locations of the underbody equipment. Seeing the prototype is short, 30’, trying to “jockey” the truck centers would only lead to other problems.

I chose to use Precision Scale Models (PSC) Baldwin MCB 7830 side frames. I know the PSC frames are 78", only 3" shorter than the Peckham 40. However there are some things I plan on doing to "take care of that."
PSC Catalogue Photo


These are lost wax castings which come in a kit and must be assembled. They are more expensive but will give a better looking set of trucks.

There are 3 reasons for picking the PSC side frames. 1st, working with brass is easier for me than soft metal. It is far easier to solder small pieces to alter the side frame members. The 2nd reason is to have a power truck which will fit completely under the decking of the flat car portion of the model. The 3rd reason will come up shortly.

If you decide to use the PSC trucks, purchase #9105 the kit without wheels. Also, try to obtain a newer (made after 2005 or so) kit. The reason is how good the castings are plus their condition.

I’ve used many PSC Baldwin trucks under my models over the past 10-15 years. When 1st starting to use them, the castings were sometimes bent-up and had a big sprue attached. Getting the base side frame straight took some work. The inner and outer equalizer pieces required a lot of cleaning. Recently the PSC truck kit appeared better looking. The base side frame was straight with little or no sprue to cut off. Less time was required to file and clean up the parts.

Once the parts are cleaned, straightened, and tested for fit; the holes for the axles have to be drilled with a twist drill of about a 0.100” diameter. How far in to drill is up to you. Since new journal lids were to be used, my hole went all the way through the journal. If you are not using new journal lids, the hole needs to be only about 0.100” deep.

I found making a jig to hold the outer equalizer with the journals level made the hole drilling process easier. Pieces of bass wood of the correct dimensions were glued to a block of wood. The side frame member with the journals was held in my hand on the jig while the journals were drilled out.

If you have dull twist drills, the brass will become hot. My recommendation is to buy a new twist drill and use a small amount of oil.

  
Assemble the 3 pieces for each side. Attach a dab of silver solder (6% silver) to the back equalizer where the front journal casting goes through this equalizer. After soldering, both equalizer parts should still move over the inner base side frame.

Instead of the PSC provided springs, Des Plains Hobbies O Scale America OSA957 – Truck Springs were used. This completes the side frames unless you have decided to add new journal lids.

Here are the 3 pieces which make up each side frame plus a package of the Des Plains Hobbies springs.

PSC has old style journal lids which look far better looking available separately. Order #5340. Eight come in a package - enough for a pair of trucks. They are small parts which you will probably have to hold in your fingers to clean up the castings. Therefore, order 2 packages just in case one of them is lost during cleaning.

The prototype 49 had "star" journal lids.  Unfortunately the correct lost wax star journal lids are no longer available. I had some and used them on this model.

If you are adding new journal lids, remove the truck springs and file off the old journal lid. Clean up the new journal lids and sweat solder a coating of solder onto their back. Place flux on the journals where the new lids are to be soldered. Place the journal lids in place one at a time, then place a drop of solder next to where the new journal lids touches the journal. The solder will flow into place. Remove the soldiering iron and allow the side frame to cool. Replace the springs.

The side frames are ready to be sent off to make the power and trail trucks. Include the truck bolsters and end cross pieces with the side frames. Whether you chose to use Current Line Models or Q-Car Company power and trail trucks, be sure to talk with the vendors about your needs.

Cheers,
Ed

Sunday, April 22, 2012

AEFRE 49 - #1 Introduction

The Aurora Elgin Fox River Electric Railway #49

This model is being built in honor of John Cloos. For those who don't know John, he was the owner of the Interurbans of the Fox Valley blog listed under “My Blog List” to the right. The last posting of the Interurbans of the Fox Valley was months ago when John died. When you have a chance look through John's blog.

I first met John a few years ago at a model train show where he had a display relating to both the Chicago Aurora and Elgin and the Aurora Elgin Fox River Electric trolley lines. His models were interesting and he often displayed them in dioramas. The dioramas were much like the photos seen in books relating to the CA&E or the AEFRE.

John modeled in HO, O, and 1/2" scales. Most of his scratch built models were made from styrene. Besides model making, John was active in other activities related to model railroading. He would often display his dioramas at non-model events. John would receive positive comments from those who attended the events. Individuals would approach John telling him of the photos or other items they had related to the trolley lines of the Fox River Valley. Because of this John was able to collect a large number of memorabilia related to the AEFRE.

About 3 years ago John, in e-mails, asked if the color of a trolley car could be determined from a black-and-white photo. I told him this would be almost impossible to do. Over the years different film and processes had been used to develop black-and-white film and print pictures. The processes used sometimes caused light painted items to be printed dark and vice versa.

John sent me a picture of the trolley car he was interested in. The photo turned out to be the Aurora Elgin Fox River Electric # 49 cab-on-flat locomotive. This is the model to be built in these posts when the loco was painted red.
In red paint John Cloos Collection

I had known #49 to have been painted at one time orange and then a red. The orange color had been used at least until September 2, 1940 when the Central Electric Rail Fans Association had had an inspection trip of the line.
In orange paint John Cloos Collection

#49 was painted red sometime after this date according to information printed in books. My best guess is the red was a dark red also called barn red(?). Caboose red would be too light of a shade of red to use. There are many shades of boxcar red. Perhaps a good shade of red could be obtained from mixing boxcar red and caboose red.

There was an article printed in the June 1996 issue of Railroad Model Craftsmen. In the article written by James Tangney are HO scale drawings of #49. The article will not appear in this blog. You can still obtain this issue of RMC on your own.

In the RMC article, the model is shown with 1 trolley pole. If you compare the photos of #49, you should notice there are 2 trolley poles. In any photo I’ve seen of #49, it always had 2 trolley poles. The author of the HO scale model article probably used only one trolley pole due to the lack of space on the roof of his model. As it is, the prototype locomotive had 2 different trolley pole bases – 4 spring horizontal and Ohio Brass Form I (also known as springs backward) trolley bases due to the lack of space.
Joseph Hazinski has offered his redrawn plans of #49 for use in this blog. His drawings are of #49 in its later (1932-1946) years. With Joe’s permission, his drawings have been used with "corrections" by me to reflect the locomotive as shown in the photo with red paint. Changes will be shown in red ink. The major changes will be the removal of the snow removal equipment and the use of 2 trolley poles.

I am very thankful of Joe's permission to use his drawings. It saved me many hours of making drawings. Plus, my drawings would not have been as good as his!

Here are the 2 sides -


Here is a top down view.

This is a end and bottom up look at the locomotive. Notice the snowplow equipment has been scratched out.


The AEFRE #49 was built at an unknown date by the AE&C. The Aurora Elgin and Chicago R.R. was in existence from 1901 to 1922 when it became the Chicago Aurora and Elgin R.R. #49 was probably built in the Wheaton shops. It had Peckham 30 trucks with 4 GE 67 motors and 2 GE K35C controllers. The locomotive was 30’ 0” long and 8’ 0” wide.

The Peckham 30 trucks had originally been installed on the 1st passenger cars the AE&C had. These trucks did not work out well for high speed passenger service and were soon replaced. The building of 49 turned out to be a good use for the Peckham trucks.

In looking at the photos of #49, the construction methods used were very simple. The locomotive is a flat car with a wooden structure built on it. The wooden structure was built using early construction methods. For example, the windows are of a drop sash construction.

It seem like all of the photos of #49 are taken from one side, the west side of the locomotive. The probable reason for this is the location of the railway itself in close proximity to the Fox River. Trying to get photos of the east side of #49 would mean standing very close to the river bank if not in the River itself.

Information and maps about the AEFRE can be found in C.E.R.A. Bulletin 105 The Great Third Rail. After abandonment of passenger service on the AEFRE, the freight service continued for many years.

As a freight only railway, the AEFRE was a side of the road operation about 3.3 miles long moving 2 to 3 freight cars at one time. At the north end were the Elgin State Hospital and Kerber Packing Co. At the south end was the interchange with the Illinois Central.

Elgin State Hospital received coal hoppers with coal for heat and the removal of ash. Kerber Packing Co. required packing material and box cars for packaged products to be taken to market.

The AEFRE still exists today as the Fox Valley Trolley Museum http://www.foxtrolley.org/  Unfortunately the 49 no longer exists. But you can ride some of the same trolleys which are riding on their home rails in the Fox Valley.


The model made in this blog will be #49 as it was in its final years - painted red without snow removal equipment. This makes an easy model to make requiring average skills.

One item I tell individuals who ask about scratch building and/or upgrading a model is to get a very good photo of the car you desire to build. This you have in the photo above. Make an 8 x 10 print. Then starting in one corner of the prototype car start going over the photo and write down the parts and unusual things you see. This will become your parts list and a sort of "punch list" of things to include in the model.

The hardest skill required, depending upon what the modeler wishes to do for power and trail trucks, includes soldering brass. The cab and outer parts of the frame will be made from styrene. Styrene flexes. Therefore, an inner frame needs to be made from brass soldered together. There will be some other parts made from brass soldered together - the roof boards and the headlight holders. Many small parts will be commerically available brass castings.

#49 would have been used during daylight hours. There will also be no lighting in the cab or headlights. MV lenses will be used in the headlight castings. This simplifies the wiring of the model.

In scratch building models, you'll discover, I'm not one for the exact model with every nut and bolt as you'll find in magazines about building a scale model of XX. I make as many errors as the next guy. When starting a new model, for me, sometimes it's same learning curve as the prior model. 

A question comes up when 1st starting the model. It will be answered in the next post.

Cheers,
Ed


Sunday, April 15, 2012

"One a Day" Car Building continued

Before showing the balance of the pages of Les Torrens's booklet, not all models lend themselves to the double sash techniques demonstrated by Bill Hoffman. However, if you are building models of wooden cars, the majority of them can be built using Bill's techniques.

With the use of "rivet decals" from Archer Transfers http://www.archertransfers.com/ , Bill's techniques can be used to build models with rivets.

On the last page of the booklet Bill's method of transferring measurements from car plans to a "design template" or "measuring stick". Since Bill had to be able to travel "light", instead of carrying around paper plans for the model he was building, he would transfer parts of the car's plan to a stick of wood.

Here are the balance of the pages of the booklet. The final page of the booklet is 13.

Cheers,
Ed


Sunday, April 8, 2012

“One A Day” Car Building

The title of this post should be “One a Day” Car Building by Bill Hoffman as Seen & Recorded by Les Torrens. Bill Hoffman, for those who do not know him, lived on the west coast. His job required traveling a lot with many evenings spent in motel rooms. When Bill was on the road, he would fill his spare time building wooden models of trolleys in either 17/64” or ¼” scale.  Both of these are considered O scale.


Bill became very proficient in building models to the point where he could complete the model in almost one day’s time, if he worked undisturbed the entire day. He built the entire roster of the Sacramento Northern both North End and South End cars and locomotives. Then he started on the Pacific Electric and may have completed the roster.


One day I met Bill in All-Nation Hobby Shop in downtown Chicago. Unfortunately, the store is not longer in existence. I ask Bill if he would come to dinner at my home that night which he did. We were friends after this. He showed me how he built his models.


Bill was a master when it comes to scratch building a model. He made it look so simple.


In 1975 Vane Jones held the Tenth Anniversary Celebration of his magazine Traction and Models, As part of the Celebration, Vane had a contest for trolley models built by scrounging around for the material using in making the model. The award would be “The Scrounge Award”. Bill and I both entered models in the contest. I won! I had built a model by scrounging around more than Bill Hoffman had - WOW!.


My model started out as a LaBelle kit of an open platform combination car. The kit was built and almost finished when I decided to make it into an express car. The passenger windows were covered over and 2 different style of ends scratch built. One end was a 3-window without an end door. While the other end was a 2-window with an end door. The ends were different so I could practice scratch building each style.

The model ran in the express car configuration for a while before plastic snow plow castings were found. At this point the car was converted again. This time it would be a line car-snow plow.


In 1973 at Trolley Meet schedule in Hamilton, Ontario, Canada; Les Torrens recorded how Bill scratch built a model in one day. With the information collected Les produced and sold a booklet on what Bill had done. The name of the booklet was “One a Day” Car Build by Bill Hoffman as Seen & Recorded by Les Torrens.

I got a copy of the booklet. It’s great for anyone who is interested in scratch building a model. Several years after obtaining the booklet, I discovered my booklet was missing a page. A letter was written to Les to find out if I could either obtain the missing page or another booklet.

A couple of months past before a note was received from Les’s widow. I did not know Les had passed away. In the note Les’s widow told me the booklet did not sell very well. There were many booklets left in the house. In cleaning-up the house after Les’s death, she had tossed out all the remaining booklets. She hinted she did not want anything to do with the booklet.

To find the missing page, I started to ask around if anyone had a copy of the booklet and if I could copy the missing page. Carl Lantz who lives in my “neck to the woods” came to my rescue. Thank you, Carl!

I now have a complete copy of Les Torrens’s booklet on how Bill Hoffman scratch built his models. Over the past few years copies of the booklet have been given out to other modelers.

Bill built his models in wood. There is no reason the same techniques cannot be utilized in building models of styrene. Both Evergreen Scale Products and Plastruct have styrene in strips and building shapes.

Below are copies of the pages of the booklet for you to use. I don’t think there is anyone to complain of copyright infringement. You show be able to print each page.

Cheers,
Ed

There are 15 pages to the booklet. Due to the large number of photos, the booklet will be split over 2 posts.


Tuesday, April 3, 2012

Sunset NSL Silverliners #15 – Epilogue and Acknowledgements

Epilogue
Some of you may ask, “Was it worth it?” Were the Sunset models worth upgrading, considering all the work, time, effort, resources, parts, etc. expended?


When I first heard Sunset was planning on producing a set of NSL Silverliner models to match the substitute Liner, I said to myself, it’s time to fatten up the piggy bank. I expected the set to sell for $1,500.00 to $1,600.00 or more. When we consider the train consists of 3 brass models, powered, with interiors, painted in a finished condition, and selling for about $500.00 each, paying $1,500.00 for a set would seem just about right.

Instead, Sunset set the retail price at about $1,100.00. I’ve put about $500.00 into the models, making their value about what I originally thought the price would be: $1,500.00 - $1,600.00.

The completed models are still not perfect and do not completely match what I could have had if I worked with MTS Imports’ painted Silverliner coaches. For 415, one of the available dining car bodies would have to be altered to a Silverliner and 415 as the tavern-lounge, then painted and finished. The cost of all 3 cars would have been far more than $1,500.00.

What is it worth to have a set of models that makes your friends say, “Wow!?”

For the set of cars painted in the Greenliner scheme, the roof and the interior of 415 seems correct for the era. The wall between the kitchen and dining area is still not correct. On the Silverliner models, the Greenliner-era roof detail of 415 is not updated. I know very little about the actual Greenliner paint scheme, but I have been told the color through the windows is not correct. I do not know the correct color. Furthermore, trying to repaint this part of the car on a finished model is hard to do. Perhaps the most glaring problem is the fixed-location couplers.

Finally, for what you get in the Sunset 3-car train, you are getting what you pay for.  The set of models could have been more accurate, but the price would have been higher!


Acknowledgements
As with any endeavor, the work is never done by one individual acting alone. Two individuals who have helped me tremendously are Greg King and Eric Bronsky. Without them this work would not have been finished! A very special  thank you goes to both Greg and Eric.


Charlie Pitts needs separate thanks for his photos and instructions on the surface mounting of the couplers and building the J-shaped couch in the 415.


Many more offered me support along the way with photos, suggestions, etc. These are, in alphabetical order, Don A. Bruno, Terrell Colson, John Giove, Tony Hultman, George Kanary, Curt Seeliger Jr., Brian Siegl, Ed Suchas, and Tony Tieuli.

Gentlemen, thank you.

Finally thanks go to Charlie Pitts and Ashley Pollard for their questions and comments during the series of posts on upgrading the Sunset Silver Replacement Electroliner. I enjoyed them and hope you did too.

Cheers,
Ed

Monday, April 2, 2012

Sunset NSL Silverliners #14 – Final Exterior Work for All Cars

This is the penultimate post covering the upgrading of the Sunset Silverliner models. When completed you will have a set of cars you can be proud to own, show-off, and operate on your layout!

Silver Stripe
One item you can do to vastly improve the external appearance of your models is to cover the gray stripe above the windows on the letterboard with a 1/32” silver stripe. Any manufacturer of striping can be used.

Car Numbers
The next thing to do is to place the silver number of your car(s) on the letterboard just in back of the motorman’s location. The numbers on the Silverliners were silver outlined in black. You may need to purchase them from Eric Bronsky. Take a look at photos of Silverliners to see the correct location with regard to the passenger windows.

After you have installed the silver strips and numerals, to protect the decals, an over coat like Testors Glosscote should be applied to seal the decals on the models. Mask off the area and spray on the Glosscote.

Windshield Wipers
Glue the windshield wipers in place on all of your cars. A dilute solution of “Kwik Seal” will work.

Test Run the 3-Car Train
Place the 3 cars and couple then up. Don’t forget the electrical connection between the lead car and the 415. Run the train. I suggest taking one of the trolley poles off the wire so you know what happens if this should occur during an operating session. You will know what to expect.

There is a tremendous amount of satisfaction knowing your models of the Chicago North Shore & Milwaukee 3-car replacement Electroliner in the Silverliner paint scheme looks like what you and others remember. You and the models have come a long way since you first open the Sunset box containing the models.

The lead car of my 3-car train #738 including, or should I say un-including, the small skirts near the doors.

The Tavern-Lounge car #415

The last car, shown backwards, of the 3-car train.


Introducing the Sunset Electroliner and the Sunset Silverliner 3-car replacement Electroliner models.


Repairing the Sunset Silverliner Stripes
If by any chance you damaged the Silverliner striping on the sides of your model there is hope!

First, please understand no matter who designs or prints replacement decal stripes, no two stripe applications or decals will be exactly the same as those designed and printed by someone else.


Greg King has had striping printed up. The print job has black striping. The striping is too dark for the models.


The striping was reprinted lighter but is too light to match the models.

This is a close-up photo of the lighter stripes. One picture is worth a thousand wards!


Second, this is going to sound just like the discussions revolving around whether a shade of paint is the same as the prototype shade of the same color. The Sunset Silverliner striping can seem to fade or disappear under different sources of lighting depending upon the direction from which the model is viewed (photoed). This comes into play as replacing the striping is attempted.

When the too dark stripes are applied 1st and then the too light stripes are applied over the dark stripes, the effect is a chose match to the Sunset stripes.


From what others or I have been able to discern, the stripes on the Sunset Silverliners appear to not be true decals but rather silk screened onto the models. If you carefully rub your fingers over the side of the models, you’ll fell the raised striping.

There are 2 conditions you will run into - medium to large areas to be replaced or medium to small areas to be repaired.

To repair a medium to large areas it’s best to replace all the striping on the side of the car to have a consistent looking striping effect. The NSL Silverliner plaque was easy to remove by placing a single edge razor blade under the plaque and raising it up. Then all the Sunset striping can be removed. Carefully using your finger nail as a scrapper, scrape off the striping. The only solvent I found which will soften, but not remove, the striping is lacquer thinner. Other solvents were tried including acetone, isopropyl alcohol, the thinner for Scalecoat I paint, and kerosene.

Lacquer thinner does not soften the striping much. It was used to clean the strip loose “bits” of striping off the side. You will probably not be able to remove all the striping. The striping immediately under the belt rail plus some other stops didn’t budge. As much as possible was removed. The side was then painted with Floquil Old Silver (metallic) paint.


Now Greg King's darker decal stripes can be applied to the side of the model.
There is a procedure to follow in placing the new stripe decals on the car. Trim the decals squarely.  Apply the middle third of the side either between the 2 vertical rivet strips OR just over the 2 vertical rivet strips. Tip the model so all the excess water will flow to the bottom edge of the side. Blot the excess water to remove it.

Apply a small amount of Walthers Solveset to the top stripe of the decal. Allow the decal to dry. Then apply Solveset brushing downward once. Do not go over the decal again. Allow the decal to dry for 12 hours or more.

Now apply either the left or right third of the side but not both at the same time. In applying the decal butt it up against the center decal. Tip the model to drain off the excess water. With a cuticle scissors cut the area of the decal over the trucks. Cut only the outside and inside parts and not the top.

Apply a small amount of Walthers Solveset to the top stripe of the decal. Allow the decal to dry. Apply Solveset brushing downward once. Do not go over the decal again. Allow the decal to dry for 12 hours or more.

Now apply the last third of the decal to the side following the steps outlined above.

When the decals have completely dried, gently wipe away any excess decaling chemicals with water and allow dry again. When dry, spray a coat of Testors Glosscote over the decal.


At this point the striping doesn't look that bad - depending upon the light, direction of viewing, etc. However, to obtain the same gray color and visual effects of the Sunset stripes; a layer of Greg King's light decal stripes have to applied over the dark decal stripes. Follow all of the above instructions to apply the light decals including the application of Testors Glosscote

When the Glosscote is dry, apply the Silverliner plaque on the side of the car. “Kwik Seal” can be used as the glue.


These close-ups are too close to truly show how close the application of the lighter strip over the dark stripe matches the Sunset stripes in color and visual effects when the model is rotated. The new decals fade and disappear the same as the Sunset stripes.


When you are too close the print of the striping shows up but from afar it looks correct.


If you are replacing small sections of striping, you will need to cut the strip of striping to almost exactly the size needed. If you don’t the overlapping striping will look darker. The same double application of both dark 1st followed by the light decal striping is required to fix the missing Sunset stripe.

This may seem like a lot of work. If it is worth fixing, it is worth doing it correctly with what is available.

Cheers,
Ed